Manual injection molding machines play a crucial role in the production of plastic parts and products. These machines enable manufacturers to create high-quality plastic components with precision and efficiency. Understanding how a manual injection molding machine works is essential to grasp the fundamentals of the manufacturing process. In this article, we will explore the various components and steps involved in manual injection molding.
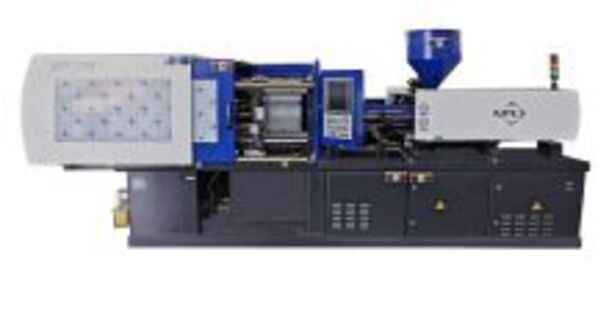
A manual injection molding machine consists of several key components that work together to create the desired plastic parts. These components include:
1. Mold - The mold is a hollow cavity that defines the shape and size of the plastic part being produced. It is usually made of steel and consists of two halves, the cavity and the core. The mold is mounted onto the machine and clamped securely in place.
2. Injection Unit - The injection unit is responsible for heating and melting the plastic material, then injecting it into the mold. It comprises a hopper, heater bands, a screw, and a hydraulic or mechanical plunger. The plastic material is fed into the machine through the hopper and is then gradually heated and melted by the heater bands.
3. Clamping Unit - The clamping unit is responsible for securely holding the mold in place during the injection process. It consists of two platens, the stationary platen and the moving platen. The mold is attached to the stationary platen, while the moving platen moves towards the stationary platen to close the mold and apply clamping force.
4. Control Panel - The control panel enables operators to control and monitor the machine's operation. It includes controls for temperature, pressure, injection speed, and other parameters. The control panel also displays important information such as the current status of the machine and any fault or error messages.
The injection molding process in a manual machine typically consists of the following steps:
1. Clamping - The mold halves are securely clamped together using the clamping unit. The mold is closed, and the moving platen exerts pressure to keep the mold tightly shut.
2. Injection - The plastic material is heated and melted in the injection unit, then injected into the mold cavity. The screw pushes the molten plastic into the mold under high pressure.
3. Cooling - Once the mold is filled with molten plastic, the cooling process begins. The plastic solidifies and takes the shape of the mold cavity. Cooling time varies depending on the size and thickness of the part.
4. Ejection - After the plastic has cooled and solidified, the mold opens, and the ejector pins or plate push the part out of the mold. The part is then removed manually or by using automated equipment.
Advantages:
- Cost-effective for small-scale production runs
- More flexibility in mold design and customization
- Suitable for a wide range of plastic materials
- Operator has more control over the molding process
Limitations:
- Slower cycle time compared to automated machines
- Requires skilled operators
- Lower production output compared to automated machines
Manual injection molding machines are an essential tool for manufacturers looking to produce plastic parts with precision and efficiency. By understanding the components and steps involved in the manual injection molding process, manufacturers can ensure the successful production of high-quality plastic components. While manual machines have their limitations, they continue to play a significant role in small-scale production runs and customized mold designs.
By continuing to use the site you agree to our privacy policy Terms and Conditions.